How’s this for a trench table?

Madscuzzy over at the B&C has built one he built in six large pieces so he has some modularity.  He used a lot of sets of Forgeworld trench inserts similar to what Jason Dyer did a few years back for Astronomi-con. His table is all done and he’s gaming on it.

Madscuzzy's Trench Table

When I get mine done it will be more modular, but unfortunately I’m doing all my trench lining by hand and I’ve done a lot more texturing of the battlefield. I’ve gone for a more authentic WW1 look, rather than a pure Sci-fi look of Madscuzzy’s board. Lets see if I can get some pictures of Dyer Straights and his board onto my blog.

Madscuzzy's Trench Table

The first two images are from the Bolter & Chainsword thread and are copyright Madscuzzy who has an overly fancy website where the 40K section doesn’t work quite right…

Below is a picture of Jason Dyer’s table and the Egyptian table formerly at Checkpoint Charlie’s in North Vancouver and now in the Astronomi-con terrain collection.

Jason Dyer's Trench Table
Jason Dyer’s Trench Table

I played on it and that was another of my Astronomi-con armies that finished tied for second or third in appearance. Yes once again I’m playing James Russo’s tyranids for the hawk-eyed among you.

Gaming terrain formerly at Checkpoint Charlie's
Gaming terrain formerly at Checkpoint Charlie’s

Additional Trench Tables

Still plugging away

So after finishing my second modular trench tile yesterday I took a break, but I couldn’t sleep so I got up and worked on terrain some more. I still plan to assemble and get painting some more miniatures for my 2010 Astronomi-con Vancouver army, but I also worked on another entrenchment. This one entirely scratch built to fill a gap, as Snapdragon only makes so many sizes and shapes. I’m wedded to the 12″ tile for at least the majority of this project. Test fit of tiles D2 and D3

I also cleaned a lot of resin this morning during the second half of the World Cup game. All these bits are from Ramshackle, they were bought for my ork army to scratch build and customize some vehicles, but a few of them will do nicely as battlefield debris.

Hand made and cast entrenchmentsI also dug out the photo I took of the drawing of how the battlefield will look. This is the second drawing and it has been fixed to the wall above my painting table for months. I’ve been scheming and planning and preparing for this project for well over a year. So far things have gone according to plan, but if I don’t get a job soon, I may have to put stuff in storage…

Update: I did have to store everything for several years and may never finish this modular trench table now, but I did start painting again.

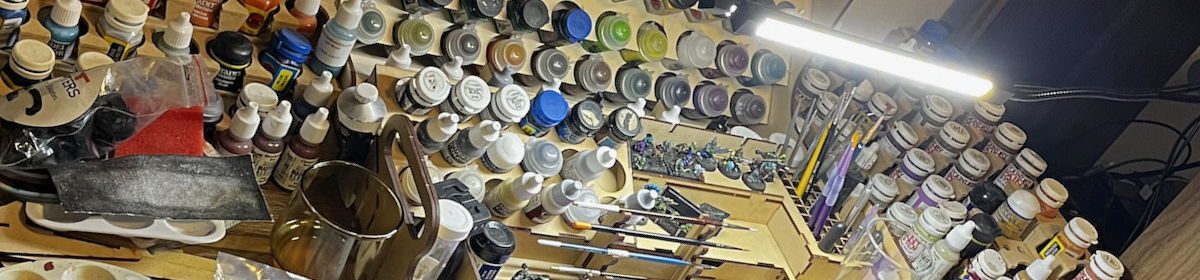
I plan to assemble several models. I actually have a written down paint queue which I regularly adjust, but don’t regularly post to the Internet. It is one of the tabs on my army Excel file which lists all the models I have painted for the Diseased Sons and the Nefarious Fire. It also shows real and hypothetical ways to field them. I’ll have to make a similar spreadsheet for the Orks eventually. I’ve held off even making an army list for them, I want to make all or as many of my old ork figures and squads legal before I worry about tactics and optimizing.

I also uploaded the document that details the plans for individual tiles, some have detailed descriptions, others are more vague. I jotted these down one night and have been updating it and the drawing when I feel the need. I’ve even worked on a No Musk’s Land 2.0 tile layout. It requires six more tiles, so that might be for 2012.

Consulting my own Excel file, as sometimes I forget to build things or paint them the correct color. Often I write which squad a model is for on the bottom of it’s base when I prime them, as sometimes models sit on my painting desk for years…

  • 2nd Test Bezerker
  • Test Servant of Decay
  • Test WW1 Canadian Corps Rifleman
  • CSM with Heavy Bolter
  • Plaguemarine with Melta Gun
  • Plaguebearer
  • Secret model

OOP Plastic BezerkerFor the test bezerker I’m using the old, original, OOP, plastic model, I have five of them still on sprues. That tells you how long I’ve been going to do some Khorne guys for… For the test Servant of Decay I think I’ll use one of the plastic Necromunda figures. He’ll be pretty much as is, but I’ll paint him in my proposed scheme of brown uniform, black boots, shoulder pads, and helmet, with purple accents. The rabble can have a variety of earth colours for their clothes possibly including some greens and reds. The big risk is the skin tone, I’m going pale blue as they are supposed to be Nurgle followers. The Plague Zombies will be more traditional greenish tinged flesh. Ramshackle Games Resin Bits

I’ve painted a number of Heavy Weapons for the Nefarious Fire but no Heavy Bolter, which as the cheapest will be pressed into duty for my Chosen. I don’t know when the plastic CSM with Heavy Bolter came out, but I’ve never painted one, so that is the fig I plan to use. The plaguemarine is just for looks, I have unused metal Plaguemarine havoc bits, so I figure I’ll paint one up. The plaguebearer is just for fun, I like to have one on my paint table to use up colors or to test techniques, Nurglings are great for this too. I’ve already got a couple on the go, which along with touching up some old models I hope to finish off quickly.

WIP Demons

2 Tiles Down, 22 to Go

Paint PaletteI finally finished the second modular trench terrain tile. This is tile D2. The last few days I haven’t been productive. I’ve slept in a couple times instead of getting up early to read the paper, paint, watch the world cup, and of course look for a job. I’ve now been unemployed for three months. I had an interview recently, but it wasn’t a slam dunk, so I have to wait and see and keep looking and applying to other jobs.

I’ve put a lot of effort into these trench tiles but I have to switch to my 2010 Astronomi-con Vancouver army. It will once again be Chaos Space Marines.

The second tile looks big because it is four inches wide, too wide. I did things in a slightly different order, I also used some new materials. I tried out cork rubble and pre-made plastic sandbags. They came out looking too smooth, I don’t like it. Next time I use them I’ll probably put a dusting of sand on top to give them some texture and variety. Either that or run a board along the top, both are realistic. Affixing Trench Sign

I put a little more ‘stuff’ scattered around this tile, but I think I need even more inside the trench. I might try painting it first then gluing it down, though to get that half buried look, you need to glue it down before most of the grit. I also think next time I’ll have less grit inside the trenches and I’ll leave bigger spaces between the planks. I experimented a bit with rust techniques using different pigments, but still also using Rust Brown Ink and Foundation Orange both diluted with water.

I tried to get a yellower canvas color on the sleeping bag or rain cover that is sitting on one of the rocks. I used Iyanden Dark Sung and Gryphonne Sepia for the most part to achieve the color. I’ll test it on an Imperial Guardsmen soon. Finished Tile Number 2

Not all washes are an improvement, one of mine had too much ‘rusty red’ in it or I should have started from scratch rather than trying to lighten the previous wash…  Anyway I’ll just have to start from scratch with the lightest orange rust pigment I have. I need even more little cups on my palette. I’m just waiting for the last few washes and coats of paint to dry then I’ll have up some photos.

So far no comments on this entire blog, but I’m not getting any search engine traffic or basically none, which is odd because the Greening the Inner-city blog gets some and it had mostly linking to it early on, but it must have more variety of incoming links. I’ve posted links to the odd forum and on the Lead Adventure Forum and the Miniatures Page there is a little discussion about this project, but it is mostly me talking to myself as usual. Looking down the trench

I had to put on my “Music to play 40K to” mix as my downstairs neighbour has lately taken to playing loud crappy hip hop.  I have by far the louder stereo so I now have Rage Against the Machine of all things…

Slightly Higher Res shot showing details

Not quite finished tile two

Today was a little more productive and as it was Canada Day, perhaps my recent readings and research into the Canadian Corps was well timed. Tonight I tried to finish the second modular trench tile. Alas I did not make it. I got most things painted but I need to finish off some fine details and paint the two big rocks. Drybrushed Dirt

I did finish the scatter terrain, even painted some sort of growth on one of the embankments. I was originally not going to paint it green, just leave it brown but I looked at some of the other trench tables out there and they had greenery, though historically in the really heavily fought over sectors everything was just blown away into dirt and rubble. There are some pretty hardy plants so I figured some sort of moss or fungus or algae could survive on the side of a trench so I painted it up to look like that.

I shouldn’t have started on the bed roll or rain sheet, whatever it is, I should have painted it after the rock, but I wanted to try and get a better canvas color, one that more closely matched the 08 Webbing used by the Canadian Corps and the BEF after about 1915. My World War One army is going to be modeled as if it was early 1916 so they will have 08 webbing and Lee Enfield rifles, not that it is really a big deal at 28 mm, but it is the thought that counts. Test fitting scatter terrain

I also watched another of the supposedly best World War One movies, this one is called “The Grand Illusion” and it is another black and white film it is also another French language film. It seems the French made more movies about WW1 than they did about the second world war. It isn’t a bad film, shows the transition from wars fought by professional soldiers to wars fought with enlisted or even drafted men, men who weren’t career soldiers. It does not have a single trench battle or any battles at all. It takes place almost entirely indoors and the French soldiers spend the majority of the movie trying to escape. It is like the Great Escape or Hogan’s Heroes in that regards.

I might order another book or here’s a thought try to get some from the library…  I also still need to find a job so maybe I should focus my reading to that end.

Mostly painted trench tile

Not all quiet on the Western Front

I wasn’t very productive today. I didn’t find a job. I didn’t watch the World Cup. I didn’t finish the second trench tile. I didn’t even watch a film. However I have worked on the trench tile. I did watch “All Quiet on the Western Front” last night and I’ve been reviewing my other research material, principally two books. Maximum Grit

“The Canadian Corps in World War I”, is an Osprey title, perhaps the first one I bought. It has a Van Doo on the cover and I pretty much will do a unit of them, how big of a unit I’m not sure. Three officers and 116 enlisted men would be the best number. The other book I bought is called “Postcards from the Trenches”, it is real postcards produced during the Great War that this collector ultimately donated to a museum and they produced the book. It and the film reveal that my trenches may be too orderly, but other material shows it was all a matter of what sector the photos were taken in. The Canadians or the Stormtroopers as the Germans dubbed them were always sent where the fighting was thickest Vimy, Ypres, the Somme.

As for modeling, after a coat of thinned down white glue dried, I then painted the tile black with a 1″ brush and Rustoleum brand black paint. After that I twice went over the tile with a much smaller bush and Ceramcoat black. Both times I used my ‘dab and jab’ technique as this keeps as much grit as possible in place and also is the only way to get paint into some gaps. After even more black touchups, I painted the wood in the trench and just outside it Ceramcoat Terra Cota, which I thinned considerably with water. Two coats was necessary for coverage but also tends towards orange… One coat of brown paint

Hopefully after the drybrush things look fine. My two observations are it is better to leave a small gap between planks on the ground as it is easier to get the brush in there, requires less planks, and is more historically accurate. The second observation is I don’t need quite as much grit inside the trenches.  ess grit but maybe more little detail bits.

I found two more interesting links while reading threads over a the Lead Adventure forum which along with B&C, The Waaagh, and the Miniatures Page is my go to place to discuss painting, converting, terrain, and mini manufacturers. Two coats of brown

The first link is an informative page with pictures about life in the trenches of World War One along the Western Front primarily. The second link is to a new (to me) line of WW1 trench inserts. These would be inserted into correctly cut shapes of foam, saving all the bother of doing the planking and sandbagging by hand. They look pretty good, narrow, but big enough to accommodate 30mm bases apparently. They are designed for 25/28 mm miniatures. I may have to give them a go, at least their machine gun nests when I make version 2.0 of No Musk’s Land.

Tomorrow I’ll have to try harder to find a new job and it will be the drybrush fest as I will drybrush the planks, the sand and dirt, and the sandbags to match the first tile.